The Musician's EarTM Stereo Microphone
Instructions
Caution: Not a toy. Keep away from children and pets.
Do not step on mike.
Do not trip on cable.
Do not try to remove cable from mike.
Do not use cable to carry mike.
Do not swing mike on cable.
Do not touch black discs on top. (They are the microphone elements.)
Do not expose to sun, rain or condensation.
Do not remove bottom cover.
Do not touch circuitry.
Do not leave batteries in place if mike will not be used for a long time.
Included:
- Musician's Ear stereo microphone
- Book, To Hear Ourselves As Others Hear Us, by James Boyk
You Will Also Need:
- Two 9V batteries. (That is, standard flat 9-volt batteries, preferably alkaline; for example, Radio Shack 23-875.)
- If "Line" input of your recorder is not a stereo mini jack (1/8"), obtain adapter from Radio Shack or other supplier. (Example 1: If recorder input jacks are "RCA" type, you can use Radio Shack coupler, catalog #274-886, and Y-adapter cable, catalog #42-2483. Example 2, also for recorder with RCA jacks: Use #274-876 adapter from 1/8" stereo jack to 1/4" stereo plug, #42-2548 adapter from 1/4" stereo jack to 2 RCA plugs. Example 3, to go to 1/4" stereo jack: Use #274-876 adapter alone.)
To Use The Musician's Ear:
- Insert new 9V batteries (not included) into holders, observing polarity. (Always replace both batteries at once, with new ones.)
- Press button on top and it should light up pale green. (Shade with hand if in doubt.) This is both pilot light and battery-level indicator. When light first goes out, mike will work fine for two or three more hours. Replace batteries at earliest convenience.
- Place the Ear--
- On hard floor. If carpeted, put something thin and smooth under mike, like an LP record jacket or large thin book.
- Not too close to instruments. Start at seven or eight feet from musicians' feet.
- With "line of sight" to every instrument; don't put the Ear under a chair.
- Identifying Left and Right: To some people, the Ear looks like a face, with the switch as the "nose" and the two microphone capsules as "eyes." When the Ear is placed so that its cable outlet is toward the music, then the left and right "eyes" are the left- and right-channel microphones, respectively.
- Route cable to avoid anyone's tripping. For greater safety, tape cable down with continuous run of duct tape. (It's all right to run the cable under a rug, but don't step on it.)
- Plug cable into line input of any recorder (not mike, or mic, input). Use adapter if needed. If one jack serves for both mike and line inputs, be sure it's set to act as line input before inserting mike plug.
- As with any microphone, adjust recorder's "record-level" control so meter flickers into the top end of range on the loudest passages. If the recorder has "automatic gain control" (AGC), like many MiniDisc machines and nearly all VCRs and cheap cassette recorders, turn off the AGC to preserve the dynamics of your playing. On some machines, AGC must be turned off again each time you start recording. Check the recorder's instruction manual.
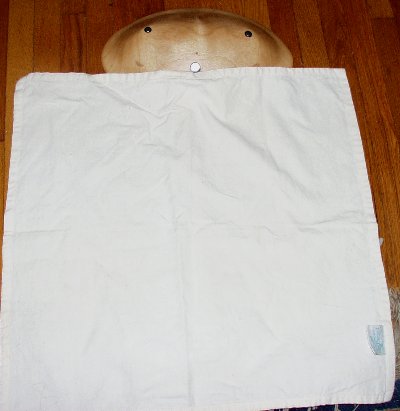
- Adjust the tonal balance if necessary. In most circumstances, the balance of bass and treble will be fine. If the sound is too bright, try moving the Ear farther from the instruments. If you can't do this (for instance, the edge of a stage is too close), place a small piece of thin cloth on the floor next to the mike, so it's a kind of "apron" to the Ear, on the side toward the instruments. Run the cloth up onto the lower part of the mike on that side, if you wish, but don't cover the switch or the microphone elements. Any cloth is fine: a rag, a piece of felt; whatever's handy, so long as it's thin and lies flat. (See picture.) If the floor is carpeted and you've put something hard under the mike following instruction 3, above, shift that object to expose the carpet on the side facing the instruments. A small area of carpet or cloth will affect the treble noticeably.
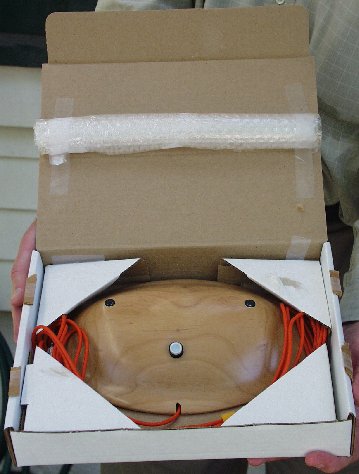
- Pack The Musician's Ear for shipping in original inner box as shown. Note that the roll of bubble wrap is placed to restrain the body of the ear but not to touch the microphone elements. Size of roll is such that top of box will not completely close; this allows pressure relief for microphone elements. Tape front edge of inner box, and pack box in original outer box with non-dusty cushioning on all six sides.